java
- 2014년 자바 스프링 커리큘럼 2023.07.03
- 자주 사용하는 리팩토링 5가지 2022.06.01
- request, response, forward, redirect 2014.04.06
- commons-fileup 샘플 2014.01.03
- Processing, 쉽게 시작하는 프로그래밍 교육용 개발 환경 2014.01.02
- Paypal이 Java에서 node.js 로 간 이유 2013.11.29
- [GAE] 데이터 저장하기 DatastoreService 2013.11.21
- 쉬운 자바 배우기 방송 자료 2013.10.26
- gradle로 이클립스 프로젝트 만들기 2013.10.21
- gradle로 자바 빌드하기 1/2 2013.10.18
2014년 자바 스프링 커리큘럼
2023. 7. 3. 20:20


![초급자를 위해 준비한 인프런 [데브옵스 · 인프라] 강의](https://okdevtv.com/images/inflearn-react-api.webp)
자주 사용하는 리팩토링 5가지
2022. 6. 1. 05:40
리팩토링
- Re + factor + ing = 재구성
- 코드의 재구성
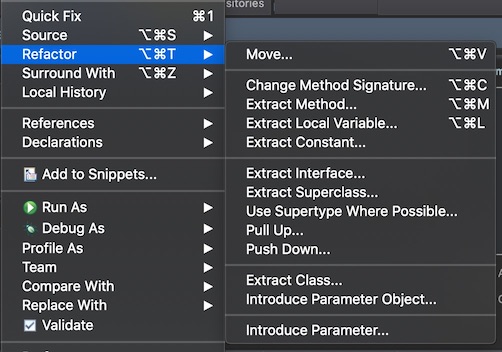
자주 사용하는 리팩토링
- Rename Variable
- Extract Variable
- Extract Constant
- Inline
- Extract Method
YouTube
- 자주 사용하는 리팩토링 5가지
request, response, forward, redirect
2014. 4. 6. 04:36
commons-fileup 샘플
2014. 1. 3. 20:25
요즘은 정말 스택오버플로우의 코드조각을 많이 참고합니다.
2000년에 만들어진 cos.jar를 보내드리고, 아파치 커먼스의 업로드 컴포넌트를 사용해 봤습니다.
https://github.com/kenu/oksample/tree/master/commons-fileup
/*** code from: http://stackoverflow.com/questions/15432024/how-to-upload-a-file-using-commons-file-upload-streaming-api*/@WebServlet("/upload4")public class UploadServlet4 extends HttpServlet {private static final long serialVersionUID = 1L;protected void doPost(HttpServletRequest request,HttpServletResponse response) throws ServletException, IOException {PrintWriter out = response.getWriter();response.setHeader("Content-Type", "text/html");out.print("Request content length is " + request.getContentLength()+ "<br/>");out.print("Request content type is "+ request.getHeader("Content-Type") + "<br/>");boolean isMultipart = ServletFileUpload.isMultipartContent(request);if (isMultipart) {ServletFileUpload upload = new ServletFileUpload();try {FileItemIterator iter = upload.getItemIterator(request);FileItemStream item = null;String name = "";InputStream stream = null;while (iter.hasNext()) {item = iter.next();name = item.getFieldName();stream = item.openStream();if (item.isFormField()) {out.write("Form field " + name + ": "+ Streams.asString(stream) + "<br/>");} else {name = item.getName();System.out.println("name==" + name);if (name != null && !"".equals(name)) {String fileName = new File(item.getName()).getName();out.write("Client file: " + item.getName()+ " <br/>with file name " + fileName+ " was uploaded.<br/>");File file = new File(getServletContext().getRealPath("/" + fileName));FileOutputStream fos = new FileOutputStream(file);long fileSize = Streams.copy(stream, fos, true);out.write("Size was " + fileSize + " bytes <br/>");out.write("File Path is " + file.getPath()+ "<br/>");}}}} catch (FileUploadException fue) {out.write("fue!!!!!!!!!");}}}}
Processing, 쉽게 시작하는 프로그래밍 교육용 개발 환경
2014. 1. 2. 22:23
프로그래밍 교육 처음에 가장 넘기 힘든 것이 개발환경을 구축하는 것입니다. 자바의 경우 JDK 설치하고, CLASSPATH 설정하고, 등등등
그래서 저는 자바스크립트가 브라우저로 쉽게 시작할 수 있는 것이라 생각하고 있었습니다.
그런데 진짜가 나타났습니다.
개발환경을 자동 지원해줍니다. 자바스크립트의 경우, 크롬브라우저가 바로 실행되고, 자바는 애플릿으로 바로 뜹니다. 안드로이드는 이클립스가 없이도 SDK만 설치해서 연결하면 됩니다. 현재는 3가지 언어를 지원합니다.
자체적으로 Processing.js 라는 언어를 사용하고 있는데, 몇 권의 서적도 나와있습니다.
"Processing is a programming language, development environment, and online community. Since 2001, Processing has promoted software literacy within the visual arts and visual literacy within technology. Initially created to serve as a software sketchbook and to teach computer programming fundamentals within a visual context, Processing evolved into a development tool for professionals. Today, there are tens of thousands of students, artists, designers, researchers, and hobbyists who use Processing for learning, prototyping, and production."
프로세싱은 프로그래밍 언어, 개발 환경, 온라인 커뮤니티입니다. 2001년부터, 프로세싱은 기술을 이용한 시각 예술과 시각화 분야에서 소프트웨어 역량을 진흥시켜 왔습니다. 초기에 소프트웨어 스케치북으로 사용되거나, 시각화 영역에서 컴퓨터 프로그래밍 기초를 가르치기 위해 만들어졌지만, 프로세싱은 전문가들을 위한 개발 도구로 진화했습니다. 오늘날에는, 프로세싱을 사용해서 배우고, 프로토타이핑하고, 제품을 만드는 수많은 학생, 예술가, 디자이너, 연구원, 동호회원이 있습니다.

다음과 같은 특징이 있습니다.
- » Free to download and open source
- » Interactive programs with 2D, 3D or PDF output
- » OpenGL integration for accelerated 3D
- » For GNU/Linux, Mac OS X, and Windows
- » Over 100 libraries extend the core software
- » Well documented, with many books available
윈도우, 맥, 리눅스 OS를 지원합니다.

jdk가 설치되어 있지 않아도, java applet이 실행됩니다. 배포 패키지에 java가 들어가 있기 때문이죠.
processing.exe를 실행하면 다음과 같은 스플래시 화면이 뜹니다. 만든 분 이름이 보이네요. Ben Fry, Casey Reas. 오픈 프로젝트이고요.

이클립스보다 메뉴가 아주 단순합니다. 툴바의 아이콘이 실행, 정지, 새파일, Open, Save, Export Application 입니다. 우측에 작업중인 언어가 Java로 표시되어 있습니다.

하지만 줘도 못먹는 화면입니다. 실행 버튼 클릭하고 아래 콘솔을 보면 null (멍~~~)해집니다. 당.황.하셨어요~~ 모드죠.
그리고, 어디서 많이 봤다 싶었는데, 아두이노의 개발환경과 똑같습니다.
팁을 하나 알려드리자면, 메뉴에서 File > Examples... 가 있습니다.

여기에 있는 코드를 보고 학습을 하면 될 것입니다.

개발 도구의 우측에 Java 라고 쓰여진 버튼을 확장 시켜서 다른 언어 모드를 추가할 수 있습니다.

안드로이드, 커피스크립트, 자바스크립트, PDE X, Tweak Mode 를 추가할 수 있습니다.

새로운 개발 플랫폼, 흥미롭습니다.
하나 더,
프로세싱을 통해서 만들어진 것들의 전람회입니다.
http://www.processing.org/exhibition/
Paypal이 Java에서 node.js 로 간 이유
2013. 11. 29. 14:08
이번 주 zdnet을 통해서 기사가 나왔습니다.
http://www.zdnet.com/how-replacing-java-with-javascript-is-paying-off-for-paypal-7000023697/
Paypal이 Java를 버리고, node.js로 서버를 변경했다고 합니다. 기사에 링크된 페이팔 블로그 링크에 옮겨간 이유가 나옵니다. 여러 이유가 있겠지만, 서버에서 프론트까지 같은 언어로 커뮤니케이션하는 것이 좋다고 판단했다는 이유가 눈에 띕니다.
"It unifies our engineering specialties into one team which allows us to understand and react to our users’ needs at any level in the technology stack."
from: https://www.paypal-engineering.com/2013/11/22/node-js-at-paypal/
오래 전부터 프로토타이핑을 해왔고, 올해부터 서비스에 적용했다고 합니다. 웹 애플리케이션 프레임워크로 express를 쓰고, Grunt 작업 실행기와 설정을 위해서 nconf를 사용했다고 zdnet이 전합니다.
개발 생산성 향상은 다음과 같습니다.
2배 더 빨라졌고, 더 적은 인원으로 Built almost twice as fast with fewer people
33%라인 수가 줄었으며 Written in 33% fewer lines of code
40%의 파일 갯수로 만들어 집니다 Constructed with 40% fewer files
자바가 파일이 많기는 하죠. 스프링이나 EJB 모두 말이죠.
성능에 대한 그래프도 응답시간이 줄어서 node.js 쪽이 나은 데이터가 공개되었습니다. 고객의 대기시간이 줄었다는 얘기죠.

java 시장이 현재 크지만, node.js로 인해 많이 잠식될 것 같습니다. 당장은 아니라도 말이죠.
ps. Douglas Crockford님이 야후에서 Paypal로 간 까닭은?http://techcrunch.com/2012/05/13/paypal-gets-its-own-share-of-the-yahoo-diaspora-hires-java-icon-douglas-crockford/
[GAE] 데이터 저장하기 DatastoreService
2013. 11. 21. 05:59
구글의 앱 엔진(http://appengine.appspot.com/)은 데이터를 저장할 때 비용이 발생합니다. SQL을 사용하려면 더 비쌉니다.
간단히 데이터를 저장하고 빼는 방법으로 DataStore API를 제공해줍니다. 그리고, 저장된 데이터는 관리자 웹 페이지를 통해서 확인할 수 있습니다.
저장하는 절차는 다음과 같습니다.
1. 환경에서 DatastoreService를 가져옵니다.
2. Key를 만듭니다. Key의 종류와 key 이름을 추가합니다.
3. 레코드는 Entity 클래스를 이용합니다.
4. entity에 key : value 형식으로 기록할 데이터를 입력합니다.
5. Datastore에 entity를 추가합니다.
private static final String KEY_KIND = "Game";
private static final String keyName = "games";
DatastoreService datastore = DatastoreServiceFactory.getDatastoreService();
public void save(Game game) {
Key entityKey = KeyFactory.createKey(KEY_KIND, keyName);
Entity entity = new Entity(KEY_KIND, entityKey);
User firstUser = game.getFirstUser();
User secondUser = game.getSecondUser();
entity.setProperty("first", firstUser.getName());
entity.setProperty("firstchoice", firstUser.getChoice());
entity.setProperty("second", secondUser.getName());
entity.setProperty("secondchoice", secondUser.getChoice());
entity.setProperty("datetime", new Date());
entity.setProperty("ip", game.getIp());
datastore.put(entity);
}
관리자 페이지에서는 다음과 같이 화면이 제공됩니다.

데이터를 꺼내오는 방법은 다음과 같습니다.
1. Key를 만듭니다.
2. Query를 만들면서 정렬순서와 기준 항목을 정합니다.
3. Datastore에서 Query를 이용해서 데이터를 꺼냅니다.
4. Entity 목록을 처리합니다.
public List<Entity> fetchAll() {
Key entityKey = KeyFactory.createKey(KEY_KIND, keyName);
Query query = new Query(KEY_KIND, entityKey).addSort("datetime",
Query.SortDirection.DESCENDING);
List<Entity> games = datastore.prepare(query).asList(
FetchOptions.Builder.withLimit(5));
return games;
}
쉬운 자바 배우기 방송 자료
2013. 10. 26. 22:57
gradle로 이클립스 프로젝트 만들기
2013. 10. 21. 23:45
build.gradle에 다음 한 줄만 추가하면 됩니다.
apply plugin: 'eclipse-wtp'
gradle build로 실행하면 .project, .classpath 두 파일이 생깁니다.
total 48
drwxr-xr-x 11 kenu staff 374 10 21 23:35 .
drwxr-xr-x 11 kenu staff 374 10 20 15:24 ..
-rw-r--r-- 1 kenu staff 1358 10 21 23:35 .classpath
drwxr-xr-x 3 kenu staff 102 10 21 23:35 .gradle
-rw-r--r-- 1 kenu staff 355 10 21 23:35 .project
drwxr-xr-x 3 kenu staff 102 10 21 23:35 .settings
-rw-r--r-- 1 kenu staff 228 10 21 23:35 build.gradle
drwxr-xr-x 3 kenu staff 102 10 20 15:04 gradle
-rwxr-xr-x 1 kenu staff 5080 10 20 15:04 gradlew
-rw-r--r-- 1 kenu staff 2404 10 20 15:04 gradlew.bat
drwxr-xr-x 4 kenu staff 136 10 20 14:59 src
이클립스에서 이 디렉토리 지정하고 import 하시면 됩니다.
gradle로 자바 빌드하기 1/2
2013. 10. 18. 18:10
빌드도구 Maven의 시스템을 그대로 사용하는 gradle은 IDE보다 command로 먼저 학습하는 것이 좋습니다.
http://spring.io/guides/gs/gradle/#scratch
문서가 아주 쉽게 잘 나왔네요.
시작은 아주 간단합니다.
1. gradle 설치
사이트에서 다운로드 받은 뒤에 적당한 곳(예, C:\java\gradle-1.8)에 압축을 풀고 %JAVA_HOME%\bin; 처럼 C:\java\gradle-1.8\bin; 을 시스템 환경변수 Path 에 추가합니다.
cmd 창을 새로 열어서 gradle 명령어가 동작하는지 확인합니다.
2. 자바 소스 컴파일
다음과 같은 구조의 자바파일 두 개가 있다고 합시다. Maven과 구조가 같죠. 첨부한 파일 압축을 풀면 됩니다.
 gradle-start.zip
.
├── build.gradle
└── src
└── main
└── java
└── hello
├── Greeter.java
└── HelloWorld.java
프로젝트 최상단 폴더에 build.gradle 이라는 파일을 만들고 그 내용에 한 줄만 넣으면 됩니다.
apply plugin: 'java'
이제 컴파일하는 절차만 남았습니다.
gradle build
:compileJava
:processResources UP-TO-DATE
:classes
:jar
:assemble
:compileTestJava UP-TO-DATE
:processTestResources UP-TO-DATE
:testClasses UP-TO-DATE
:test UP-TO-DATE
:check UP-TO-DATE
:build
BUILD SUCCESSFUL
Total time: 4.677 secs
gradle build 라고 입력하면 자동으로 컴파일합니다.
.
├── build
│ ├── classes
│ │ └── main
│ │ └── hello
│ │ ├── Greeter.class
│ │ └── HelloWorld.class
│ ├── dependency-cache
│ ├── libs
│ │ └── gradle-start.jar
│ └── tmp
│ └── jar
│ └── MANIFEST.MF
다음과 같이 실행해 볼 수 있겠죠.
java -cp build/libs/gradle-start.jar hello.HelloWorld
또는 class를 직접 실행할 수 있습니다.
java -cp build/classes/main hello.HelloWorld
jar파일이 필요한 것은 다음 글에서 정리해 보겠습니다.